How to defrost a freezer in 6 simple steps
Wondering how to defrost a freezer or fridge-freezer? It’s simple with this easy step-by-step guide


Knowing how to defrost a freezer correctly will help your appliance work more efficiently, which in turn will save you money.
Defrosting the freezer if often left on the spring cleaning checklist because, let's face it, it's a hassle. But leaving this essential kitchen cleaning task for too long will cause even more problems in the long run. This is because if your freezer is packed with frost and ice, it’s going to have to work extra hard to ensure the contents are kept fresh, resulting in a higher electricity bill.
To make this important chore less of a task, we've asked experts how to defrost a freezer effectively and efficiently, and they've shared their tips for freezers, fridge-freezers and chest freezers.
How to defrost a freezer in 6 easy steps
Mastering how to defrost a freezer is incredibly achievable in six simple steps, however it can be a messy job and one that does require a little bit of time.
"The size of your freezer will depend on the time it takes to thoroughly defrost, and it shouldn’t be rushed. So, allow yourself a timeframe of 16-24 hours to get the job done correctly, " advises Faye Lord, on behalf of the refrigeration maintenance and servicing team at KJ Refrigeration.
1. Switch off your freezer
If your freezer is a separate appliance from your fridge, such as a chest freezer, you should begin by switching it off at the wall.
But what if you have a combined fridge-freezer? Can you defrost your freezer without turning off the fridge? Yes, absolutely. “If you have a fridge-freezer, you might prefer to keep the appliance switched on so as to stop food in the fridge from spoiling,” advises Edward Jonkler, managing director of Remora Cleaning Ltd. It’s worth noting, however, that leaving the fridge on will slow the defrosting process, and will ultimately use more electricity.
Sign up for the woman&home newsletter
Sign up to our free daily email for the latest royal and entertainment news, interesting opinion, expert advice on styling and beauty trends, and no-nonsense guides to the health and wellness questions you want answered.
It’s also worth noting that choosing a cooler day to defrost your freezer could be wise – higher temperatures are more likely to have a negative defrosting impact on the food you’re removing.
2. Prepare the space surrounding your freezer

As the ice melts, there’s a high chance that the floor surrounding your freezer is going to get wet. Before getting started, it's a good idea to turn off all electrics around the freezer, and lay down something to soak up any water spillages.
"Lay old rags and towels onto the floor next to your freezer, and also place them inside the freezer on the bottom shelf," advises Faye. "Some freezers have a built-in drainage hose, and you should put it into a large empty bucked during defrosting."
“Determine where the drain plugs are and then pull them out,” says Edward. “If possible, attach a garden hose to the exterior drain plug and direct the water outside.” If this isn’t possible, keep the surrounding floor space protected from any excess water.
3. Empty the contents of your freezer
Always empty the contents of our freezer for best results. "Your freezer should be completely empty before attempting to defrost," advises Faye. "So pick a suitable day or two for defrosting and plan to use up the frozen food or store it in an alternative freezer."
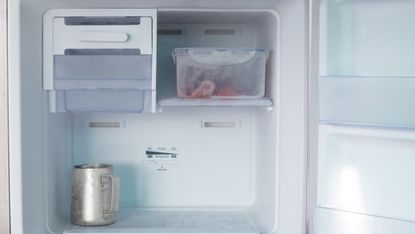
Have cool bags at the ready to place frozen food into, limiting the negative impact that time out of the freezer will have on them. Additionally, take out any parts of the freezer that are removable (such as shelves or detachable drawers) and place them in the sink to thaw. Now’s the perfect opportunity to give them a good clean and make sure they can be returned to your freezer in sparkling condition.
4. Wait for the ice to melt
This is the time to begin the actual process of defrosting your freezer. It will naturally begin to defrost now that the door is open and it has been unplugged.
"Leaving the ice to melt naturally is the best method when defrosting a freezer. With it switching off simply leave the doors open," says Faye.
Edward suggests you should ideally leave the freezer door open and allow the freezer to defrost for around 24 hours, changing the towels or floor covers as required. If you’re in a hurry, though, you could consider using a plastic spatula to gently help to remove the ice rather than scratch it off.
5. Gently clean the inside

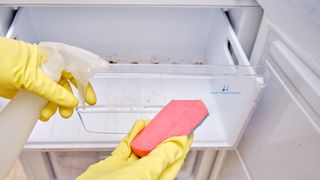
Once fully defrosted, it’s time to get cleaning – a freezer is difficult to clean when icy, so take the opportunity to do it now. Take out any drawer compartments to clean them separately.
You can use the same methods and products as you would when cleaning the fridge, or for a natural solution we recommend diluting a mixture of bicarbonate of soda and water applied with a sponge. Tough-to-remove marks can be tackled with a spritz of white vinegar and then wiped away with water.
"With your freezer now fully defrosted and clean, give it a quick dry with some kitchen towel before reinserting the drain plugs," says Faye.
Top tip: If there are any questionable smells inside your freezer, a bowl of bicarbonate of soda can also be left in there for a few hours to soak up unwanted odors.
6. Turn the power back on and allow to cool
The last step is to switch the power back on at the wall and restock. "Once your freezer is entirely ice-free and completely clean and dry, you can plug it back in and switch it on," explains Faye. "Always wait up to 6 hours to ensure the freezer is at an optimal cold temperature before re-stocking it with food."
When replacing your food, try following the same principles for how to organize a fridge, to ensure you're using your newly defrosted freezer more efficiently.
How often should I defrost my freezer?
There’s no definitive answer to this question but many experts will agree on defrosting a freezer at least annually. "You should aim to defrost your freezer once a year but more often if you are experiencing frequent ice build-up," advises Faye.
The easiest way to know if your freezer is in need of some TLC is to keep a watchful eye on the amount of ice that sits within it.
“You should defrost your freezer every time it builds up a layer of ice, typically ¼ inch thick on the inside surfaces,” agrees Edward. How often this happens varies from freezer to freezer but typically speaking, this will be once a year.
All that said, there’s technically no such thing as doing it 'too often' so if you want to incorporate it into biannual or perhaps even quarterly cleaning practices around your home the option is there.
The main inconvenience of defrosting your freezer too regularly is the risk of spoiling the food within. “In the weeks leading up to defrosting your freezer try to use up as much of your food in the freezer as you can,” Edward advises. An easy way to do this is to use your blender or food processor to whizz up smoothies or sauces. “Or, try to not buy so much frozen food so that you don’t have to move too much into a cool bag or alternative freezer when defrosting.”
What causes ice to build up in my freezer?
Every time you open your freezer door, warm air floods into it. As this condenses and freezes, frost and ice gradually build up on the shelves and walls of the freezer.
To slow the build up of ice in your freezer, be more intentional with how often you open your freezer door – don’t leave it open for any longer than you need to. Like organizing a kitchen or organizing a pantry, better freezer organization can help make it easier to find what you’re looking for, limiting the amount of time you need to have the door open.
If you’re still concerned about the amount of ice your freezer seems to be producing, check that the door hinges are still tight and use a screwdriver to retighten them if they’re loose. Loose hinges can result in an imperfect seal which, in turn, can lead to more warm air getting in. "If your freezer does create bulky ice build-up regularly, you should seek expert advice to check your freezer’s seal for damage or buy a new one," adds Faye.
Can you defrost a freezer with hot water?
You definitely can defrost a freezer with hot water – this is a great method to try if you want to defrost a freezer a bit faster than the above method.
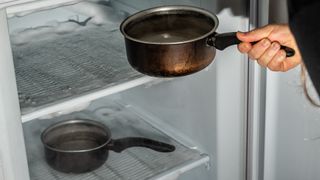
Simply boil some water in a pan, place the pan on an empty shelf inside your freezer (ideally on top of a trivet or similar, never use boiling water without a pan) and leave it, with the freezer door left open. If you haven’t already, cover the surrounding floor with towels to absorb any water.
After about 30 minutes, the hot water should have melted a significant quantity of the icy build-up – leaving you free to carefully tackle any leftovers with a soft scraper. If there’s still a lot of ice, simply reheat the water and start the process again.

What should you not do when defrosting a freezer?
As tempting as it is to try a host of hacks suggested for speeding up the ice-melting process, many of them – such as spritzing your freezer interior with a de-icer or using a hairdryer to heat things – are largely inadvisable due to safety hazards.
You should also never use mental implements to scrape away any ice because this can cause major damage, as Faye is keen to stress, "don't use a knife to scrape the ice as this can cause damage to your appliance and can crack the interior."
And while hot water is a good way to get the job done quicker (as detailed above), Faye warns, "never pour boiling water directly onto the ice as the intense heat can also cause cracks in the freezer’s interior."

Tamara is a highly experienced homes and interiors journalist, with a career spanning 22 years. Now the Lifestyle Editor of womanandhome.com, she previously spent 17 years working with the style teams at Country Homes & Interiors and Ideal Home, and it’s with these award-winning interiors teams that she gained a wealth of knowledge and honed her skills and passion for styling and writing about every aspect of lifestyle and interiors.
A true homes and interiors expert, Tamara has served as an ambassador for leading interior brands on multiple occasions, including appearing on Matalan’s The Show and presenting at top interior trend forecasting events such as the Autumn Fair and Spring Fair.
-
 Keira Knightley styles the best chocolate brown blazer with a blush pink skirt, coffee tone jumper and white slingback heels
An oversized blazer is the answer to our cold-weather styling dilemmas
By Molly Smith Published
-
 Shetland season 9 ending explained: Who murdered Annie and Bergen?
We delve in the Shetland season 9 final episode to unpick everything happened, and find out who was responsible for the death of Annie and Bergen.
By Lucy Wigley Published